Showing posts with label Jamie Cardoso. Show all posts

Friday, October 30, 2009

Arch Viz book now available

Well it seems like I've been waiting for this moment for a long time.. :-). The 2nd Edition of the book "Realistic Architectural Visualization with 3ds Max and mental ray" is now available.

The book was co-authored by myself and Jamie Cardoso. It features sections on the basics of mental ray, and project based sections where you develop materials and lighting for real scenes. These scenes include; an interior of a living room, a photomontage of an exterior of a building, an interior atrium, and a harbor.

You can order the book in the US on online sites like Amazon.

Here are a few more images from the book, which are based on the projects you work through in the chapters.


Tuesday, August 04, 2009

New Arch Viz Book


The 2nd Edition of the Realistic Architectural Visualization with 3ds Max and mental ray is now in production at Focal Press. The book has been rewritten almost from the ground up, with 2 entirely new scenes depicting renderings of an atrium, and a building exterior photomontaged into a photo of the building site.

Plenty of new techniques are depicted in the scenes which were carried over from the 1st edition.

There is also an entirely new Introductory section which explains concepts of using mental ray with 3ds Max & 3ds Max Design.

You can preorder the book at several online retailers including amazon.com

I'll post more images in the next few weeks.

cheers
rec

Monday, February 18, 2008

New Tip and Trick from Jamie Cardoso

About final gather

When saving the fg file at a small image size (IE 400x200 pixels), you should ensure that the image ratio and the camera view are locked. Prior to creating the final big size renders (IE 2500x1250 pixels).

In addition, is prudent to first save the fg files in one computer only; preferably in one's local drive. Once the files are saved, you should then place (copy & paste) the saved the fg files in the network where other machines can find it. The same procedure should be applied to animations.

Note that, once the fg files are saved, any further changes to the lights, fg settings, objects and some material settings such as displacement values, self illumination values and glows, may result in having to delete and resave the fg files.

To delete, simply uncheck the Read Only (freeze) function, followed by clicking the X button to the right once or twice. Save the fg file again.

Any changes other than the ones mentioned earlier won't need the fg to be resaved (IE most material settings etc).


Myth about Final Gather files

A number of people believe that the secret behind achieving great renders lies in the fg and gi settings. This couldn't be further from the truth.


The fg settings are essential to produce renders and eliminate light bouncing artifacts. However there are only 3 factors that will significantly improve your renders:


1- The final Image sampling will ultimately change the look of your final image (IE from draft to high end).


2-A strategic use of lights and its colours (IE the placement of lights in areas of the scene where there is going to be an apparent definition between bright and dark areas, otherwise known as depth. Also, highlights in the scene and a wise choice of light colours).There are numerous architecture books focusing mainly in photography that you can use as reference for lighting.


3-Good choice of materials. With mental ray, most of the default shader settings are set to draft. If you have a good understanding these settings and utilize them accordingly, you will obtain superb results. Having objects with correct scale and realistic effects will also contribute to outstanding renders (IE correct bump values, right amount of glossiness; accurate shading and bitmap tiling etc).


In our book, Realistic Architectural Visualization with 3ds Max and mental ray, we have used relatively high fg settings in order to achieve satisfactory results. Generally keeping the fg settings as draft should be enough to render great images. I normally only change the following settings:


Rays per FG Point to 150: Note that higher values will dramatically increase the render times and Initial FG Point Density function can solve most fg problems.


Interpolate Over Num. FG Points to 80 as this won't affect much the fg process render times


Diffuse Bounces to 1/2 if there are any fg artifacts, simply increase the Initial FG Point Density to 3 or 4. Note that higher values will increase the fg process render times dramatically.


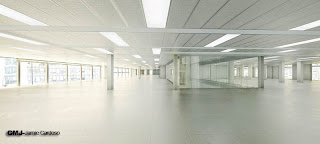
The ambient occlusion normally occurs in areas that are not directly lit by light. Most Hollywood CG studios use it also for directly lit areas as it adds an extra depth of reality to the renders. To do so, simply apply the ambient/Reflective Occlusion (base) parameters to the diffuse slot of your pre applied arch design shader.


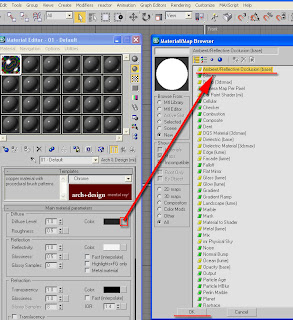
If you previously had a bitmap applied to the diffuse slot, simply click the bitmap slot inside bitmap parameters.


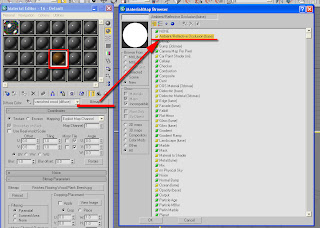
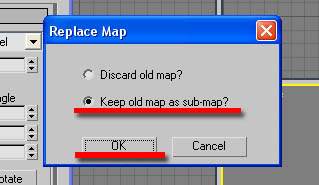
Double click the ambient/Reflective Occlusion (base) parameters from the material/map browser. The replace map dialog box should appear, choose to keep the old map as sub-map.


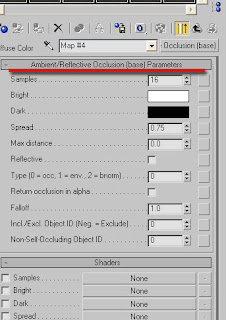
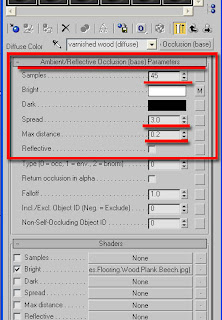
There should be quite a few settings, but simply focus on the first 5 of them. When working with real size models, I normally use the following settings: (assuming that you are using meters as the unit system)


Samples=45 note that this won't increase the render time much
Bright=diffuse original colour (It is the slot where the diffuse bitmaps or shaders are applied to. If there are no bitmaps or shaders to be applied)
Dark=black colour
Spread=3.0
Max Distance=0.2


I only use it on every non transparent object.


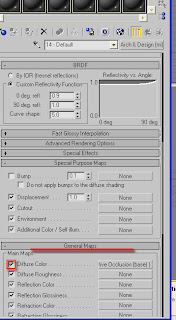
Note that shaders such as satined metal from arch & design won't enable any bitmap/shader used in its diffuse colour slot. To enable it simply go to the arch & design main template and pan down to general maps parameters, and check the diffuse color function to enable it. In addition, go back up to the diffuse color swatch, copy by right clicking on it, click on the slot. In the ambient/Reflective Occlusion (base) parameters, paste it onto the bright colour swatch


Valuable Tips:


1-Metal shader: At times you may need to darken its original color diffuse swatch when working in relatively bright scenes.


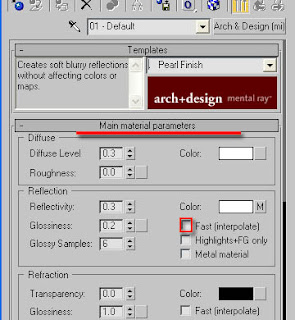
2-By default most arch & design shader settings are set to draft. For best results without compromising the rendering times, simply:


a) uncheck the fast (interpolate) function


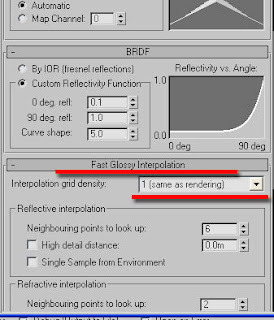
b) Change the interpolation grid density to 1(same as rendering)


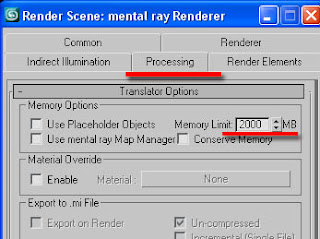
3-Another method to help prevent loss of memory while rendering, is to increase the memory limit to about 2000


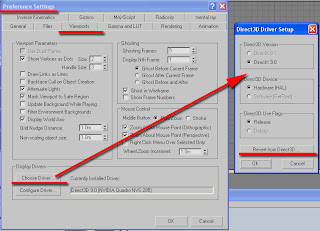
4-At present, direct 3d driver set up, works best with 3ds max 9 or higher, as oppose to any other driver. Users often experience memory, rendering and viewport display problems, when not using the adequate driver set up. To choose the driver, simply go to: main toolbar and click customize. On the dropdown list choose preferences; the dialog box choose pop up. To change the current driver set up simply click on the Revert from ... button.


5-When using mental ray, it is wise to apply the UVW modifier on objects that have shaders containing bitmaps. (IE Satin Varnished Wood; Glossy Varnished Wood; Rough Concrete; Polished Concrete; Glazed Ceramic; Glazed Ceramic Tiles; Masonry; Leather and Brushed Metal) Otherwise, you may encounter some UVW error messages when rendering.


6-At times when working in very bright or dark scenes, use the curve and/or RGB values to correct, brighten or darken materials.


7- You can also use the RGB and curve values as light sources, however you need to have at least one real light source in the scene, even if its multiplier value is only 0.5.


It is often easier to use the RGB and curve values without the exposure controls. This is due to the fact that, exposure controls evens out bright and dark areas of the scene.


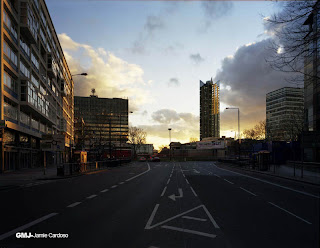
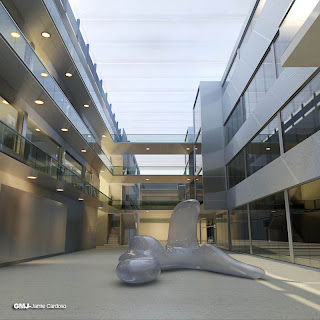
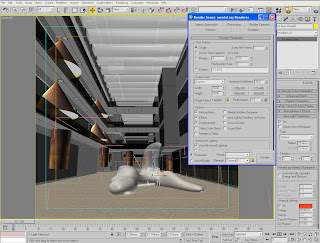
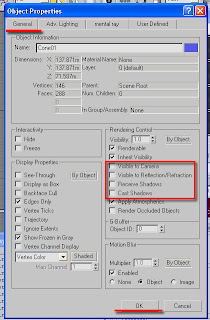
In the image below, the coned shaped geometry and other objects had their bitmaps used as light sources to light up the scene. High RGB and curve values were used to achieve the right intensity of brightness and colour. The objects used as light sources had their physical properties set to: not cast shadows, not to receive shadows, not visible to camera, and not be visible to reflection/refraction.


8-The Glass (Thin Geometry) shader should be used mainly on straight surfaces, to avoid artifacts.


9-When using Glass (Physical) shader on surfaces that are not straight (IE revolving doors, spheres etc), its surface may render black at times. To correct this, simply change its diffuse colour swatch to a brighter colour.


10- When Network rendering, keep the backburner files as simple as possible to prevent rendering errors.

Saturday, January 26, 2008

Tips and Q+A with Jamie Cardoso

All,

My co-author on the book: Realistic Architectural Visualiztion with 3ds max and mental ray, Jamie Cardoso, has sent me a number of tips and a Q+A, that we thought might be nice to post on this blog. So you should see a number of new posts in the next few minutes, I hope you like them.

cheers
Roger C.

Grainy Quality to mr Renders

Q + A With Jamie Cardoso: Grainy Quality to mr Renders

Question: I bought your book Realistic Arch. Vis. And have gone through the first interior room tutorial. I’ve been trying to learn Mental Ray for a year now, but one thing I can’t figure out is why the renders of your files have this strange grainy quality to them. I’ve never produced a render with this using my own files, and I can’t figure out what it is about your settings which could be causing this. Can you please advise?

Jamie: This is to do with the fact that the render is at a small output size and also when the light's radius values are very high. This artifact happens with every high end rendering engine. Moreover, it frequently happens in enclosed scenes where lights (more than one) are bouncing across far too many objects.

There are 2 ways of by passing this:

1-To keep it at a small render size and get rid of the graininess, one should increase the U & V mr light samples (under area light parameters) to a point where there are no more grains (the value of 10 should be enough). This process will require some test renders, and it will increase the render times dramatically. By the way, this subject is mentioned in the book, at the end of the interior daylight tutorial.

2-The most common option amongst Hollywood film companies and 3D visualizers, is to render at higher resolution (IE 2500 pixels and above), and later decrease its original output size (IE 800 pixels) in photoshop etc, for web or e-mail purposes. Higher resolution renders are normally used for movies, publishing or marketing purposes. By the way, the big size render tutorial of the book cover image is also covered in the book.

When going through this tutorial, as mentioned in the book: save first the fg file by checking the read/write file function and clicking render at draft sampling settings (IE box filter; samples per pixel minim. 1/4 maxim. 4), the render size should not be higher than 500 pixels . Once rendered, the fg should be saved by then. The next step is to keep the read/write file function checked and also check the read only (fg freeze) this time around to ensure that the fg process will be bypassed. Finally set the final render output size to 2500 pixels or higher followed by also increasing the Sampling settings (IE gauss or mitchell filter type, samples per pixel min. 1 max. 16 or 64).

In both options, the rendering times will increase considerably however; the 2nd option is more reliable and professional.

Distributed Bucket Rendering, Windows Firewall Updates

Tips from Jamie Cardoso #1: Distributed Bucket Rendering, Windows Firewall Updates


For distributed bucket rendering, Windows firewall updates are now blocking the mental ray distributed bucket rendering system for max 9 and 2008


(IE raysat_3dsMax2008_32.bat;raysat_3dsMax2008_32.exe;raysat_3dsMax2008_32server.exe).


All the above for max 9 and 2008 need to be included in windows firewall exceptions list. To do so, simply go to: control panel + security center + windows firewall + in the exceptions list, simply add (program...) the list of raysat files for max 9 and 2008,one at the time. By the way, the raysat files can be found in: C:\Program Files\Autodesk\3ds Max 9 and/or 2008\mentalray\satellite.

Distributed Bucket Rendering

Tips from Jamie Cardoso #3: Distributed Bucket Rendering


IP addresses are more reliable and recommended by hollywood movie companies and visualization companies however, depending on the way one's network is set up, one may need to type the computer's name instead in order to make it function.

Big Marketing Images

Tips from Jamie Cardoso #3: Big Marketing Images


When rendering images bigger than 4000 pixels (marketing) with mental ray in one computer only, make sure that one uses the network render instead of distributed bucket rendering as mental ray may not render them. (depending on your machine's specs) To bypass this, simply send the file as net render and choose (check) split scan lines. Once that is checked, define the strips setup (pop up dialog box). I normally keep the settings as default and only change the overlap to 1 and check the delete the temporary images upon completion function, however one can choose the settings that best suits their computers.

Arch & Design shaders

Tips from Jamie Cardoso #4: Arch & Design shaders

I normally use customized materials, but for those who use default arch & design materials:

When applying shaders such as satin varnished wood shader and etc, one should be careful when network rendering. The satin varnished wood shader normally generates temporary bitmap/s( IE finishes.flooring.wood.plank.beech.jpg) in a localdrive. When sending the 3ds max to net render across another machine/s, the other machine/s may not have this file, which will subsequently generate errors in backburner. Even the backburner's include maps. function doesn't work at times.

The most reliable way of re-pathing any missing maps is to first use the archive tool to archive the file (IE file + archive..). This tool will also collect all the maps in your 3ds max scene. Thereafter one should use the asset tracking tool to re-direct all the missing files to the area where your archived files are. If there are any unused paths in the asset tracking dialog, simply strip them with strip path tool. Do not use the the include maps function from backburner.

By the way, to configure paths with the asset tracking, simply select any path from the asset tracking dialog box list, and right click. A pop up menu should appear. One can choose to either browse... or strip from the pop up menu. When browsing for a file, ensure that the map is found, selected and opened...or it won't reconfigure the path on the asset tracking. To access the asset tracking tool, simply go to file, on the drop down list, choose asset tracking.

Tuesday, August 28, 2007

Realistic Architectural Visualization - Reprint and Corrections

Good news and bad news.


Good news is the Realistic Architectural Visualization with 3ds max and mental ray book which I co-authored with Jamie Cardoso has now gone into a second printing. We were able to fix a few things in the book but unfortunately one was too late for the print / reproduction process (The bad news). So I'm posting it here and providing you a downloadable file to replace the exising file.

In Appendix 3, there is a file on the CD which is not referenced in the tutorial but which is provided to give you an idea of what the scene and file should look like once you are finished. Unfortunately, there is something wrong in the file which will give you incorrect results. In the file DOF_FE_Final.max Exposure controls have been turned on. To correct the error you can simply do the following:


  1. In the Render pull down menu, select Environment.

  2. In the Environment and Effects Dialog, go to the Exposure control rollout.

  3. In the Exposure Control type pull down list, change the type to no exposure control.

Now you are ready to render the scene and get the same results as when you go through the tutorial in the book.


If you would simply like to download a corrected file it is contained in a .zip file at the following URL.


http://www.mediafire.com/?doukbyydpn0