Changing Wall Materials Vertically.
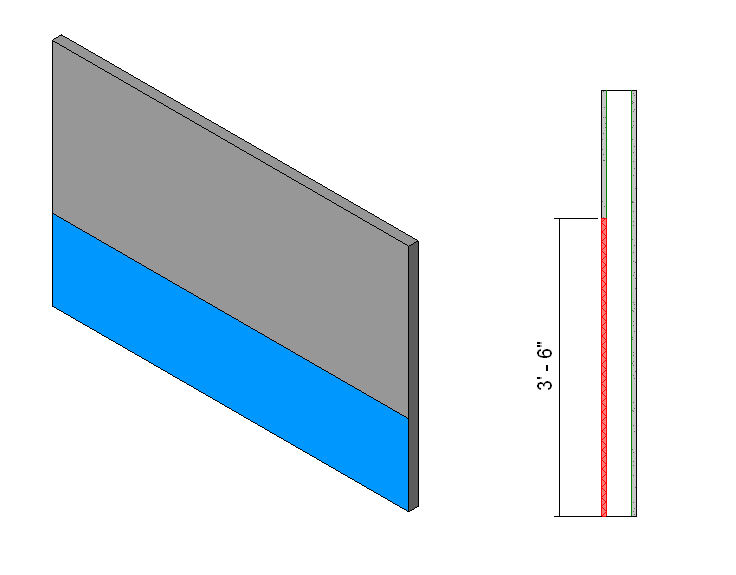
I decided to write out the following simple exercise because I found it difficult through much of the documentation to figure out how to create a wall which changed from one material to another vertically. There appears to be 3 different methods of creating walls which change materials vertically. Example 1: a fairly simple transition where the wall profile and thickness does not change. For example a bathroom wall which has tiles to about 3’6” (1050 mm) then the remainder of the way gypsum board.
1/ Create a new project in Revit using the default.rte imperial or metric template file.
2/ Select the Wall Tool in the Design Bar.
3/ Select the Properties Button on the options bar.
4/ In the Element Properties Type List Select the Interior – 4-7/8” (138mm) partition (1-Hr.) wall.
5/ Click Edit New.
6/ Click Duplicate.
7/ In the Name Dialog Enter, Interior - Bathroom Partition.
8/ Click on the Edit button next to the Structure parameter.
9/ Click on the Preview button in the lower left of the Edit Assembly dialog.
10/ In the view pull down list, Select: Section: Modify type attribute.
11/ Change the Sample Height to 5’-0” (1525mm).
12/ Right Click in the Sample area and Select Zoom to Fit.
13/ Select the first row (#1) of the Layers of the wall.
14/ Click on the Split Region button in the Modify Vertical Structure area.
15/ Click in the section view on the highlighted side of the wall. Approximately 3’-6” (1050mm) from the bottom.
16/ Click on Row number 1 in the Layers area.
17/ Click on the Insert Button.
18/ Change the Function of the new row to Finish 2 [5].
19/ Change the Material to: Finishes – Interior – Tile.
20/ Change the Shading color of the Interior Tile material to blue.
21/ Click the Assign Layers button in the Modify Vertical Structure area.
22/ Click on the lower section of the region you split earlier. The New Tile Material is assigned to this area.
23/ Click Ok until you exit all dialogs.
24/ Draw a Wall Using this new wall structure and view it in a 3D view.
25/ Set the shading mode to Shading with Edges The blue shaded area is the area is the area with the tile finish.