About final gatherWhen saving the fg file at a small image size (IE 400x200 pixels), you should ensure that the image ratio and the camera view are locked. Prior to creating the final big size renders (IE 2500x1250 pixels).
In addition, is prudent to first save the fg files in one computer only; preferably in one's local drive. Once the files are saved, you should then place (copy & paste) the saved the fg files in the network where other machines can find it. The same procedure should be applied to animations.
Note that, once the fg files are saved, any further changes to the lights, fg settings, objects and some material settings such as displacement values, self illumination values and glows, may result in having to delete and resave the fg files.
To delete, simply uncheck the Read Only (freeze) function, followed by clicking the X button to the right once or twice. Save the fg file again.
Any changes other than the ones mentioned earlier won't need the fg to be resaved (IE most material settings etc).
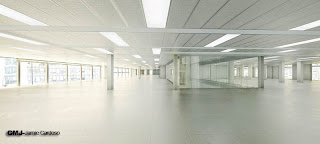
Myth about Final Gather filesA number of people believe that the secret behind achieving great renders lies in the fg and gi settings. This couldn't be further from the truth.
The fg settings are essential to produce renders and eliminate light bouncing artifacts. However there are only 3 factors that will significantly improve your renders:
1- The final Image sampling will ultimately change the look of your final image (IE from draft to high end).
2-A strategic use of lights and its colours (IE the placement of lights in areas of the scene where there is going to be an apparent definition between bright and dark areas, otherwise known as depth. Also, highlights in the scene and a wise choice of light colours).There are numerous architecture books focusing mainly in photography that you can use as reference for lighting.
3-Good choice of materials. With mental ray, most of the default shader settings are set to draft. If you have a good understanding these settings and utilize them accordingly, you will obtain superb results. Having objects with correct scale and realistic effects will also contribute to outstanding renders (IE correct bump values, right amount of glossiness; accurate shading and bitmap tiling etc).
In our book, Realistic Architectural Visualization with 3ds Max and mental ray, we have used relatively high fg settings in order to achieve satisfactory results. Generally keeping the fg settings as draft should be enough to render great images. I normally only change the following settings:
Rays per FG Point to 150: Note that higher values will dramatically increase the render times and Initial FG Point Density function can solve most fg problems.
Interpolate Over Num. FG Points to 80 as this won't affect much the fg process render times
Diffuse Bounces to 1/2 if there are any fg artifacts, simply increase the Initial FG Point Density to 3 or 4. Note that higher values will increase the fg process render times dramatically.
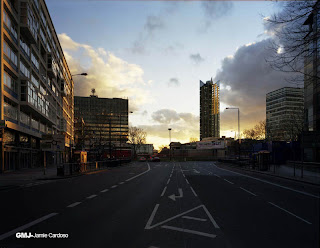
The ambient occlusion normally occurs in areas that are not directly lit by light. Most Hollywood CG studios use it also for directly lit areas as it adds an extra depth of reality to the renders. To do so, simply apply the ambient/Reflective Occlusion (base) parameters to the diffuse slot of your pre applied arch design shader.
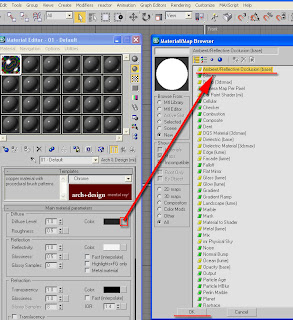
If you previously had a bitmap applied to the diffuse slot, simply click the bitmap slot inside bitmap parameters.
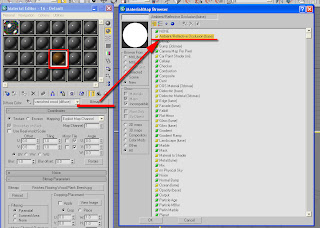
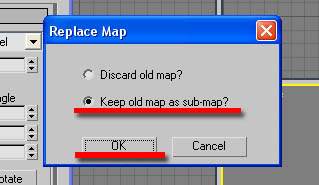
Double click the ambient/Reflective Occlusion (base) parameters from the material/map browser. The replace map dialog box should appear, choose to keep the old map as sub-map.
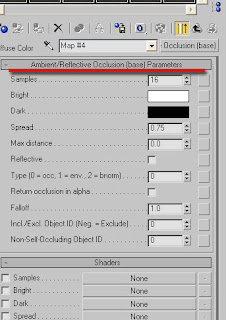
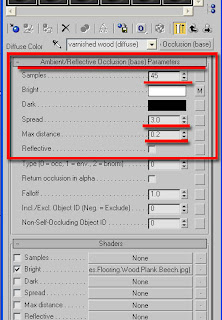
There should be quite a few settings, but simply focus on the first 5 of them. When working with real size models, I normally use the following settings: (assuming that you are using meters as the unit system)
Samples=45 note that this won't increase the render time much
Bright=diffuse original colour (It is the slot where the diffuse bitmaps or shaders are applied to. If there are no bitmaps or shaders to be applied)
Dark=black colour
Spread=3.0
Max Distance=0.2
I only use it on every non transparent object.
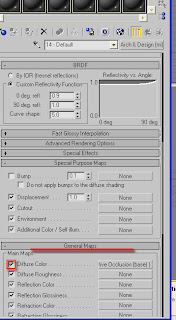
Note that shaders such as satined metal from arch & design won't enable any bitmap/shader used in its diffuse colour slot. To enable it simply go to the arch & design main template and pan down to general maps parameters, and check the diffuse color function to enable it. In addition, go back up to the diffuse color swatch, copy by right clicking on it, click on the slot. In the ambient/Reflective Occlusion (base) parameters, paste it onto the bright colour swatch
Valuable Tips:
1-Metal shader: At times you may need to darken its original color diffuse swatch when working in relatively bright scenes.
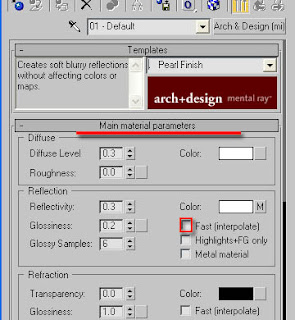
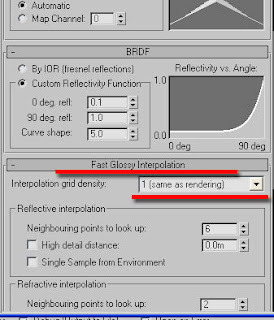
2-By default most arch & design shader settings are set to draft. For best results without compromising the rendering times, simply:
a) uncheck the fast (interpolate) function
b) Change the interpolation grid density to 1(same as rendering)
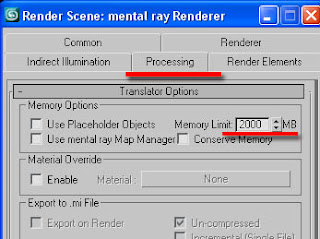
3-Another method to help prevent loss of memory while rendering, is to increase the memory limit to about 2000
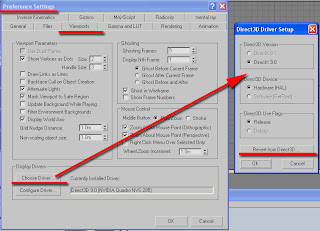
4-At present, direct 3d driver set up, works best with 3ds max 9 or higher, as oppose to any other driver. Users often experience memory, rendering and viewport display problems, when not using the adequate driver set up. To choose the driver, simply go to: main toolbar and click customize. On the dropdown list choose preferences; the dialog box choose pop up. To change the current driver set up simply click on the Revert from ... button.
5-When using mental ray, it is wise to apply the UVW modifier on objects that have shaders containing bitmaps. (IE Satin Varnished Wood; Glossy Varnished Wood; Rough Concrete; Polished Concrete; Glazed Ceramic; Glazed Ceramic Tiles; Masonry; Leather and Brushed Metal) Otherwise, you may encounter some UVW error messages when rendering.
6-At times when working in very bright or dark scenes, use the curve and/or RGB values to correct, brighten or darken materials.
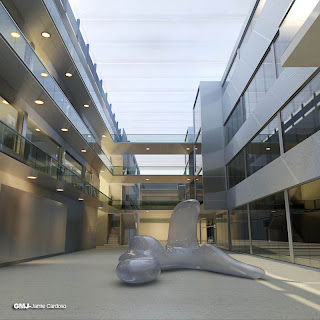
7- You can also use the RGB and curve values as light sources, however you need to have at least one real light source in the scene, even if its multiplier value is only 0.5.
It is often easier to use the RGB and curve values without the exposure controls. This is due to the fact that, exposure controls evens out bright and dark areas of the scene.
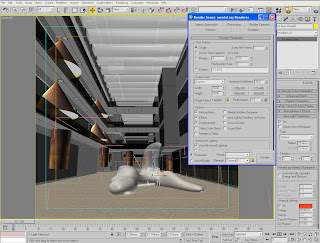
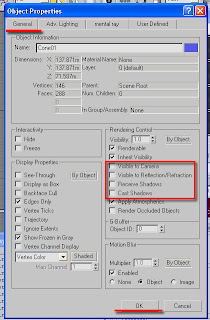
In the image below, the coned shaped geometry and other objects had their bitmaps used as light sources to light up the scene. High RGB and curve values were used to achieve the right intensity of brightness and colour. The objects used as light sources had their physical properties set to: not cast shadows, not to receive shadows, not visible to camera, and not be visible to reflection/refraction.
8-The Glass (Thin Geometry) shader should be used mainly on straight surfaces, to avoid artifacts.
9-When using Glass (Physical) shader on surfaces that are not straight (IE revolving doors, spheres etc), its surface may render black at times. To correct this, simply change its diffuse colour swatch to a brighter colour.
10- When Network rendering, keep the backburner files as simple as possible to prevent rendering errors.


 There are some very interesting Revit families to create windows on the site, and I think its commendable that things have come this far with what is a free site fed by community members. The first image is an image of an impressive window with ornamental trim. It does though act more like a traditional AutoCAD block rather than a family. It has two sizes which you can't adjust though parameters, and only the depth of the window was adjustable, and that did not work 100% either.


 One of the projects which I had the pleasure to work on recently, was for the Autodesk Media and Entertainment division's education department. The project entailed writing a short tutorial on the process involved in rendering a Revit 3D model in 3ds Max.


